Building a Fake Boulder Background
This guide is created by Green Chapter — Nature Workshop Studio, where we focus on creating living ecosystems through hands-on experience. We share practical insights across terrariums, aquascaping, plants, and natural systems to help you build and care for your own.
Large canyon-style terrarium and paludarium backgrounds often look impossibly heavy. Many hobbyists assume these builds are created using massive solid rock walls, expensive custom fiberglass panels, or professional fabrication workshops.
In reality, a huge number of dramatic hardscape walls are actually lightweight foam structures hidden beneath textured cement coatings.
This approach solves several real hobbyist problems at once:
- Real rock is extremely heavy
- Large stone layouts become expensive very quickly
- Heavy pressure points can become dangerous for glass tanks
- Giant rocks are difficult to shape naturally
- Maintenance becomes difficult once large hardscape is locked into place
Using simple packing foam, repair cement, sand, and basic hobby tools, it is possible to create massive canyon walls that look like solid stone while remaining surprisingly lightweight underneath.
This article explores a full DIY fake boulder background build designed around approachable hobbyist tank sizes such as:
- 90×45×45 cm
- 90×45×60 cm
- Large MIUS terrariums
- Exo-Terra style vertical builds
The goal is not perfection.
The goal is creating believable large-scale hardscape using cheap materials, practical workshop tricks, and patience.
What You'll Be Building
This project breaks down into four major stages before the final installation.
| Part | Main Focus |
|---|---|
| Part 1 | Building the lightweight foam skeleton |
| Part 2 | Carving canyon textures and rock surfaces |
| Part 3 | Turning the foam into fake stone using cement |
| Part 4 | Preventing the entire wall from floating upward |
Project Overview
| Category | Details |
|---|---|
| Difficulty | Intermediate DIY |
| Recommended Tank | 90×45×45 cm or 90×45×60 cm |
| Estimated Build Time | 2–4 days including curing |
| Main Materials | Packing foam, cement, silicone, sand |
| Main Goal | Create realistic giant canyon walls without using heavy stone |
| Best For | Terrariums, paludariums, dry canyon layouts, lightweight vertical hardscape |
Material List
| Material | Purpose | Easy Alternative |
|---|---|---|
| Packing foam / appliance foam | Main canyon structure | Styrofoam blocks |
| Aquarium silicone | Gluing foam together | Foam-safe glue |
| Utility knife | Rough carving | Bread knife |
| Soldering iron / foam cutter | Burning rock textures | Heated metal tool |
| Fast-drying repair cement | Fake stone outer shell | Tile grout |
| Black cement dye | Dark stone coloration | Charcoal powder |
| Sand / lava dust | Surface texture | Fine gravel |
| Bamboo skewers | Hidden reinforcement support | Chopsticks |
| Plastic light diffuser grid | Hidden locking base | Plastic egg crate |
| Zip ties | Joining background to base | Plastic cable ties |
| Spray bottle | Cement curing moisture | Hand mister |
| Dust mask / respirator | Protection from foam fumes | N95 mask |
Before You Start
One of the biggest mistakes beginners make is trying to build these backgrounds perfectly flush against the tank glass.
Do not do this.
Always leave:
- roughly 5–10 mm clearance
- especially along side panels
Large foam walls slightly expand after cement coating, and tanks themselves flex slightly once filled with substrate and water.
Leaving a small expansion gap prevents dangerous pressure buildup against the glass.
A strip of black sponge or dark filter foam can later be pushed into the side gaps to hide the spacing visually.
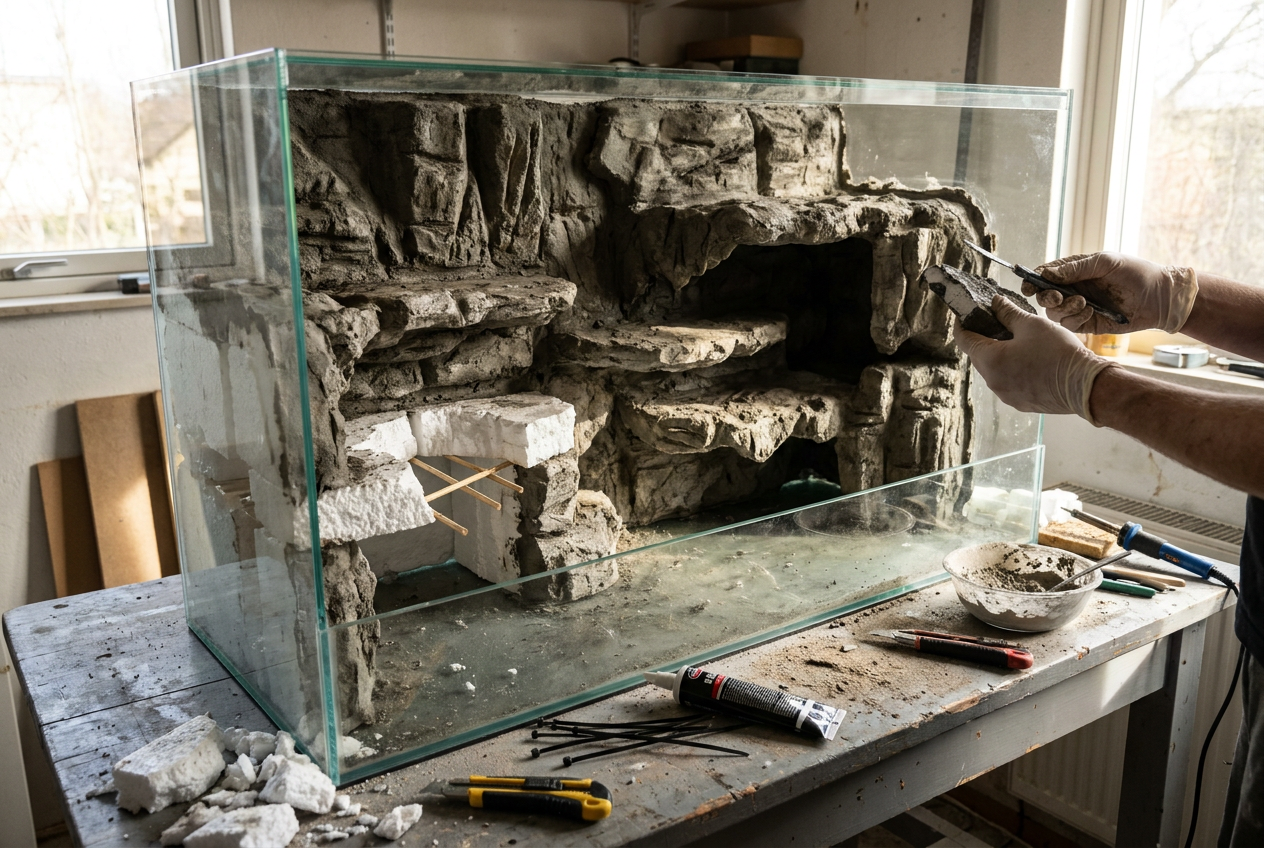
Part 1 — Building the Foam Skeleton

This stage is where the overall canyon shape is established.
The goal is not detail yet.
You are simply creating:
- cliff depth
- overhangs
- caves
- large elevation transitions
- major silhouette shapes
Think of this stage as building the bones of the landscape.
Step 1 — Creating the Backing Plate
Start with a large flat foam sheet cut slightly smaller than the rear tank dimensions.
For a 90 cm tank:
- cut approximately 89 cm wide
- leave small side clearance gaps
This thin rear layer acts as the structural backing plate that everything else attaches onto.
Step 2 — Stacking Foam Chunks

Random chunks of foam are then glued onto the backing panel using aquarium silicone or foam-safe adhesive.
At this stage:
- avoid symmetry
- avoid evenly spaced ledges
- avoid repeating patterns
Natural canyon walls usually contain:
- awkward angles
- collapsed shelves
- uneven layering
- strange fractures
The more imperfect the structure looks now, the more believable it becomes later.
Allow the entire structure to cure overnight until it becomes one rigid foam mass.
Step 3 — Hidden Reinforcement Tricks

Large overhangs become surprisingly fragile once wet cement is added later.
This is where hidden support tricks become important.
Bamboo skewers or chopsticks can be pushed diagonally through fragile foam sections like hidden internal rebar.
These invisible supports dramatically strengthen:
- cave roofs
- floating ledges
- protruding cliff shelves
Without reinforcement, large wet cement-coated overhangs can sometimes collapse during curing.
Part 2 — Carving the Rock Texture

This is where the fake foam begins transforming into believable canyon surfaces.
The goal is removing the obvious:
- factory foam appearance
- smooth geometric edges
- unnatural flat surfaces
Step 1 — Rough Mechanical Cuts
A utility knife is used first to aggressively remove:
- square corners
- repetitive shapes
- smooth edges
Cut randomly.
Do not over-plan every crack.
The best rock textures often come from rough uncontrolled cuts.
Step 2 — Thermal Texture Pass
Once rough carving is finished, a soldering iron or foam cutter is used to melt:
- erosion lines
- deep fractures
- sedimentary layers
- weathered cavities
This process also melts away visible foam beads, leaving behind a much more natural stone-like surface.
Very important:
perform this outdoors or with strong ventilation.
Burning foam fumes are unpleasant and unhealthy.
Part 3 — Turning Foam Into Fake Stone

At this stage, the foam still feels:
- light
- fragile
- obviously fake
The cement shell changes everything.
Step 1 — First Cement Coat
Mix repair cement with water until it resembles thick pancake batter.
A small amount of black cement dye helps remove the bright raw cement appearance.
The first coat should:
- fully cover all visible foam
- enter deep fissures
- create a thin stone shell
Do not worry if it looks terrible initially.
Almost every fake rock background looks disappointing after the first coat.
Step 2 — Building Texture Layers

The second layer is thicker.
This creates:
- rock mass
- sharp texture
- surface durability
While the cement is still wet:
- throw dry sand
- sprinkle lava dust
- press rough gravel lightly into surfaces
This destroys visible brush strokes and creates realistic rough stone textures.
This is usually the moment where the fake background suddenly begins looking believable.
Step 3 — Slow Moisture Curing
Cement becomes stronger through slow curing, not rapid drying.
Mist the background lightly for the next 48 hours.
This helps prevent:
- cracking
- flaking
- brittle surface failure
Rushing this stage is one of the most common beginner mistakes.
Part 4 — Preventing the Background From Floating

This is where many DIY foam walls fail.
Foam floats with enormous upward force once submerged.
A giant foam canyon wall can sometimes lift upward hard enough to:
- detach silicone
- crack joints
- destabilize hardscape
Instead of permanently gluing the wall directly onto the tank glass, a removable locking base works much better.
Step 1 — Building the Hidden Base
A plastic light diffuser grid is cut to match the bottom footprint of the tank.
The vertical canyon wall is then zip-tied securely onto this horizontal base plate.
This creates one giant L-shaped structure.
Step 2 — Using Substrate Weight as the Anchor

Once substrate is poured over the hidden base grid:
- the heavy sand pushes downward
- the foam wall can no longer lift upward
- the structure becomes mechanically locked in place
No permanent silicone attachment to the glass is required.
This also means the entire background can still theoretically be removed later for:
- maintenance
- redesigns
- repairs
Common Beginner Mistakes
| Problem | Usually Caused By |
|---|---|
| Cement cracking | Coating too thick too quickly |
| Foam collapse | No hidden reinforcement |
| Wall floating upward | No mechanical locking base |
| Artificial appearance | Over-symmetrical carving |
| Trapped stagnant water | No rear drainage channels |
| Side glass pressure | Foam cut too tightly |
Final Thoughts
The strange thing about fake rock backgrounds is that they almost always look terrible halfway through the build.
The first cement layer looks like wet grey sidewalk slurry.
The foam carving initially resembles construction waste.
The entire workshop floor becomes covered in static foam debris and cement dust.
Then suddenly, somewhere during the texture stage, everything changes.
The lava dust catches the wet cement.
The rough fractures begin resembling real canyon walls.
The fake stone starts casting believable shadows.
And the pile of discarded appliance packaging slowly transforms into something that looks older than the tank itself.