
How to Build a Simple Desktop Vampire Crab Habitat
This guide is created by Green Chapter — Nature Workshop Studio, where we focus on creating living ecosystems through hands-on experience. We share practical insights across terrariums, aquascaping, plants, and natural systems to help you build and care for your own.
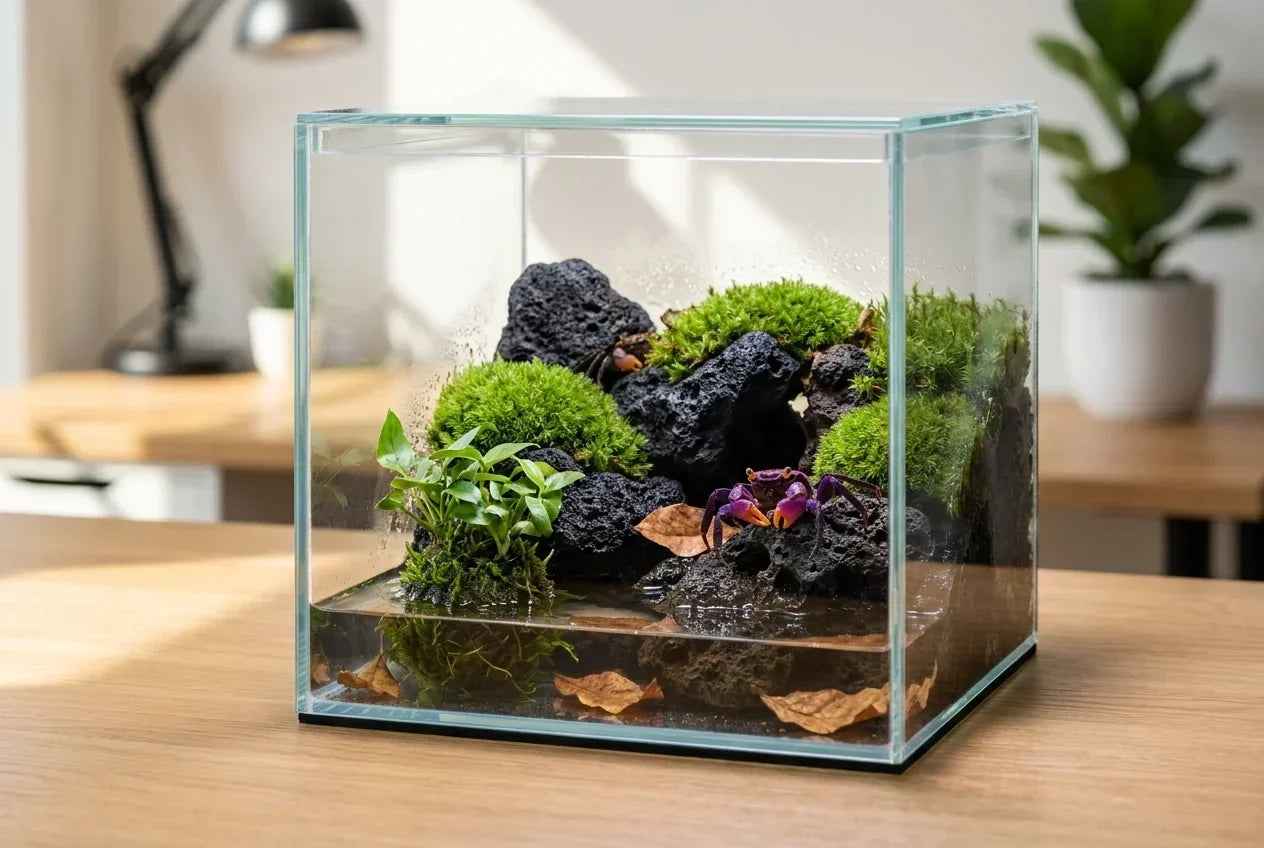
A quiet, low-maintenance habitat designed for beginners using practical ideas rather than unnecessary complexity.
Vampire crabs are one of the most rewarding nano paludarium animals to keep. Their brilliant colours, curious personalities and compact size make them ideal for a desktop habitat that brings a small piece of nature into your home or workspace.
If you've researched vampire crab care, you've probably seen everything from elaborate rainforest paludariums with waterfalls to heavily planted bioactive enclosures. These are all valid approaches, but they can feel overwhelming if you're building your very first habitat.
This guide takes a different approach.
Instead of starting with the most complicated setup possible, you'll build a compact desktop habitat that focuses on the essentials vampire crabs need every day: secure shelter, high humidity, clean water and a stable environment.
As your experience grows, you can easily expand this habitat into a larger filtered or bioactive paludarium. For now, the goal is to build a habitat that is practical, enjoyable and easy to maintain.
What You'll Build

This guide builds a compact desktop habitat suitable for:
- 20 cm Cube
- 25 cm Cube
- 30 cm Cube
- Up to 45 × 27 × 30 cm
Best suited for
- First-time vampire crab keepers
- Desktop and office displays
- Small apartments
- Hobbyists who prefer a quiet enclosure
- Small groups of vampire crabs
Main Features
- Covered enclosure
- Quiet operation without a pump
- Shallow water section
- Multiple secure hiding places
- Natural moss and Wabi-Kusa planting
- Easy weekly maintenance
This guide is designed specifically for compact desktop habitats. Once your enclosure becomes significantly larger, adding gentle filtration and water circulation becomes worthwhile and is generally recommended.
Is This Habitat Right for You?
Before buying any materials, decide whether this style of enclosure matches what you're hoping to build.
| Desktop Habitat | Larger Paludarium |
|---|---|
| Quiet, no pump | Gentle filtration recommended |
| Small footprint | Requires more space |
| Beginner friendly | More advanced planning |
| Simple maintenance | More equipment to service |
| Ideal for desks and shelves | Better as a feature display |
Neither design is better than the other.
They simply serve different purposes.
If your goal is a compact, attractive habitat that you can confidently build over a weekend, this guide is an excellent place to start.
Why We Designed It This Way
One of the first questions people ask when they see this habitat is why it doesn't include deep soil, flowing water or mechanical filtration.
The answer is simple.
This habitat was designed for a compact desktop application, not a large permanent display.
Like aquascaping, there is no single "correct" way to keep vampire crabs. Around the world, experienced hobbyists have developed beautiful bioactive paludariums, filtered vivariums and naturalistic forest habitats that support healthy, active animals.
This guide isn't intended to replace those methods or suggest they are unnecessary.
Instead, it recognises that many beginners want something smaller, quieter and easier to maintain. A habitat that fits comfortably on a desk or shelf is often more practical than a large ecosystem requiring pumps, plumbing and extensive planting.
Rather than simplifying the needs of the crabs, this guide simplifies the construction of the habitat.
Every design decision is based on the natural behaviour of vampire crabs.
Instead of deep water, the enclosure provides a shallow water area that is easy to enter and leave.
Instead of relying on deep substrate, it uses shrimp shelters, rock crevices, moss and leaf litter to create secure places where the crabs can hide, rest and moult safely.
Instead of filling the enclosure with equipment, it focuses on creating a stable environment that encourages natural behaviours such as climbing, exploring, foraging and seeking cover.
As your experience grows, there is nothing preventing you from upgrading to a larger bioactive or filtered paludarium. Many hobbyists eventually do exactly that.
For a first habitat, however, building something simple, stable and enjoyable to maintain often leads to greater long-term success than starting with unnecessary complexity.
The purpose of this design isn't to prove that simpler is better. It's to demonstrate that a thoughtfully planned desktop habitat can meet the everyday needs of vampire crabs while remaining approachable for beginners.
Step 1 — Gather Your Materials

Lay out all of your materials before you begin. Having everything prepared makes the build easier and allows you to focus on creating a stable habitat rather than searching for missing items halfway through the project.
Habitat Materials
- Glass tank (20–30 cm cube or up to 45 × 27 × 30 cm)
- Tight-fitting glass lid
- Lava rock or dragon stone
- Shrimp shelters with openings large enough for the crabs
- Coarse aquarium sand
- Wabi-Kusa
- Moss
- Dried leaf litter
Water & Care
- Seachem Prime (tap water conditioner)
- SL-Aqua GH Conditioner (for remineralising RO or distilled water)
- Cuttlebone
- Feeding dish
In the next section, you'll use these materials to build the habitat from the ground up, starting with the hiding places that form the foundation of the entire layout.
Step 2 — Build the Habitat
Now that you've gathered your materials, it's time to build the habitat.
Take your time during this stage. Unlike decorating a display tank, this habitat is built around where the crabs will live rather than how it looks from above. A few extra minutes spent planning the layout will create a much more comfortable environment for the animals.
Start with the Shrimp Shelters

Before adding rocks or sand, place the shrimp shelters directly onto the glass base.
Although they may eventually become hidden beneath the landscape, these shelters are the most important part of the enclosure. They provide secure places where the crabs can:
- Rest during the day
- Avoid more dominant individuals
- Moult safely
- Retreat when disturbed
Spread the shelters throughout the enclosure instead of grouping them together. This gives each crab more opportunities to establish its own preferred hiding place.
Try to provide more shelters than the number of crabs you're keeping. Extra hiding places reduce competition and encourage more natural behaviour.
Build the Rockscape Around the Shelters

Once the shelters are in place, begin arranging the rocks around them.
The goal isn't to hide every shelter completely. Instead, create a landscape where the entrances blend naturally into the surrounding rocks and moss.
As you build, try to create:
- Small crevices
- Gentle climbing paths
- Different heights
- Areas that break the line of sight across the enclosure
These features help the habitat feel much larger from the crab's perspective.
Before moving on, gently press on every rock to make sure it is stable. If a rock moves now, it may also move later when a crab climbs beneath it.
Add the Sand
Next, add a shallow layer of coarse aquarium sand.
There's no need to create a deep sand bed. In this habitat, the sand forms the shoreline and gives the enclosure a clean, natural appearance while making maintenance easier.
As you add the sand, shape a gentle slope towards the future water section.
Avoid steep drops or sudden edges. A gradual transition makes it easier for the crabs to move naturally between land and water.
Position the Wabi-Kusa

Place the Wabi-Kusa where it becomes the main planting feature of the habitat.
Ideally, position it close enough to the water that it remains consistently moist without sitting completely underwater.
As it grows, the Wabi-Kusa softens the rockscape, increases humidity and creates a more natural woodland appearance.
Don't worry if it looks small at first. Given time, the plants will gradually fill out and make the enclosure feel much more mature.
Attach the Moss
Rather than covering every rock, use moss selectively.
Allow some of the stone to remain visible while using moss to soften hard edges and disguise the entrances to the shelters.
This creates a landscape that feels more natural and gives the crabs additional places to explore.
Over time, healthy moss becomes one of the defining features of the enclosure.
Scatter the Leaf Litter
Finally, scatter a few pieces of dried leaf litter across the land section.
Avoid placing them neatly.
Instead, let them overlap naturally between rocks and moss.
Besides making the habitat look more like a tropical forest floor, the leaves provide additional cover and encourage more confident exploration.
As they gradually break down, simply replace them with fresh leaves.
Add the Water

Slowly fill the water section with prepared water until it reaches a depth of approximately 2–3 cm.
Before continuing, check one final detail.
Can a crab leave the water easily from every direction?
If not, adjust the rocks or shoreline now.
A shallow water area with multiple easy exits is far more important than creating a dramatic pool.
Once the water has been added, place the glass lid on the enclosure and leave the habitat undisturbed for a day or two before introducing the crabs. This allows everything to settle into place and gives you time to confirm that the humidity remains high and all hardscape is stable.
Prepare the Water
- Tap water vs RO/distilled water
- Seachem Prime
- SL-Aqua GH Conditioner
- Calcium source (cuttlebone)
- Brief note on GH rather than chasing exact numbers
Introducing Your Crabs
- Acclimation
- First 24–48 hours
- Normal behaviour
- Don't disturb or keep lifting shelters

Weekly Maintenance
Simple checklist.
- Feed small amounts
- Remove leftovers
- Weekly 20–30% water change
- Check humidity
- Replace leaf litter when needed
- Observe behaviourno need
Common Beginner Mistakes
Probably the strongest section after the build.
- Too many crabs
- Too few shelters
- Too much water
- Leaving the lid open
- Overfeeding
- Constantly rearranging the habitat
- Forgetting to remineralise RO water

Recommended Products
Instead of scattering products throughout the article, finish with:
| Product | Purpose |
|---|---|
| Seachem Prime | Tap water conditioner |
| SL-Aqua GH Conditioner | Remineralise RO/distilled water |
| Shrimp Shelters | Secure hiding places |
| Wabi-Kusa | Main planting feature |
| Indian Almond Leaves | Forest floor cover |
| Cuttlebone | Calcium source |


